Tag Archives: Networking and Operating Systems

Spring 2017 – Final Project Checkpoint 3 – Build Phase

Objective:

  • I can collect materials and begin building my experimental model to complete my project by the specified deadline.

Assignment:

  • Begin working to build your finished product.
  • Collect and begin to assemble your materials into a working product.
  • If your project does not have a physical component, begin procedures to conduct your experiment.
  • Based on this week’s build experience, continue to assess how much time you need to complete your project, and determine whether or not this project can be accomplished within the remaining four weeks (taking into account this week’s odd schedule). Adjust your timelines and project scope accordingly.
  • Checkpoint 3 will occur on Friday, April 7th. At that time, I will speak to each team, looking for evidence that sufficient progress is being made towards completion of the project within the time frame specified in the Team Project Work Plan submitted last week. All teams will be expected to provide evidence of this progress to receive credit for Checkpoint 3.

Spring 2017 – Checkpoint 2 – Final Project Planning and Research Phase

Objective:

  • I can conduct research to determine what materials, procedures and time resources I need to complete my project by the specified deadline.

Required Files:

Team Work Plan 2017

Assignment:

  • Begin working to determine what materials you need to complete your project’s finished product.
  • Determine what you need to do to assemble said materials into a working model.
  • If your project does not have a physical component, determine what procedures you need to follow to conduct your experiment.
  • Estimate how much time you need to complete your project, and determine whether or not this project can be accomplished within the remaining five weeks (taking into account this week’s odd schedule and the March 31st holiday). Adjust your timelines and project scope accordingly.
  • If you have not already, please complete a Team Work Plan and submit it by Thursday, March 30th to complete Checkpoint 2.

Spring 2017 – Final Project

Final Project

Over the next six weeks, you are tasked with developing a project that will address some aspect of Computer Science. The project must include an experimental element and a written description that combine to answer a guiding question.

 Guiding Question:

You must formulate a driving question that will guide the development of your final product. This should not be a question you already know the answer to, although you should form a hypothesis that will guide your testing. Nor should it be a question that has an answer that can be looked up on Google. Your driving question should be a computer science-related question that can be answered through experimentation and proven with empirical data. Possible driving questions include (but are not limited to):

  • How difficult is it to write a computer program that can guess a password?
  • How can one design a video game that teaches someone how to do something?
  • How can one learn more about app design by creating a new app or making improvements to an old one?
  • How does a computer work, and how are all the parts connected together to create a working electronic device?
  • Do extreme temperatures (both hot and cold) affect how well a computer performs given tasks?

You will need to submit your guiding question to Mr. Marmolejo, and receive approval before the end of the week. Upload a Google Doc with your Guiding Question to today’s Google Classroom post by end of day on Friday, March 24th.

Product:

At the end of the project, you will need to have a way to demonstrate the results of your experimentation. There are 3 products to choose from, each with varying levels of difficulty. The harder the product is to create, the more points it is worth.

Option 1 – 100 points: Create a working model of your project using your own materials, or materials that are available in the Center for Computer Studies, along with a written report detailing the steps you followed to complete the project, your experimentation procedure and the results of your experiment that lead to the answer you determined for your guiding question.

Option 2 – 85 points: Create a PowerPoint presentation that discusses all the elements of your experiment and details the steps you followed to complete the project, your experimentation procedure and the results of your experiment that lead to the answer you determined for your guiding question.

Option 3 – 70 points: Create a poster that discusses all the elements of your experiment and details the steps you followed to complete the project, your experimentation procedure and the results of your experiment that lead to the answer you determined for your guiding question.

Remember, these products need to include both the visual and written elements to receive full credit.

You will have checkpoints along the way and will get feedback from Mister Marmolejo throughout the course of the project.

Do’s and Don’ts:

Do be sure to pick a project that you are interested in, and that will continue to hold your interest for the next six weeks.

Do your research in class, and your experiments if possible.

Do yourself a favor and write up a plan for the next six weeks.

Do use your class time wisely: to conduct research, to build your project or to write up the results.

Don’t pick a project that will take one day to finish and expect to chill for the next five and a half weeks.

Don’t build a project for its own sake – make sure you develop a guiding question and an experimental procedure that the project can address.

Don’t sit at your desk and watch YouTube videos, unless they are directly related to your project.

Don’t bite off more than you can chew: make sure your project is something that you can finish within six weeks.

Don’t assume that six weeks is all the time in the world. As you discovered in the Directional Antennas project, the next six weeks will go much faster than you think – plan and manage your time accordingly.

Week 1 – Checkpoint

As soon as possible, you should upload a Google Doc  to today’s Google Classroom post that contains the following details:

  • Your Name (if you are teaming up with someone, include both team members’ names)
  • Your guiding question
  • If you are teaming up with someone, you must submit a Team Agreement as well (edit the PDF document in Acrobat and upload a digital copy to the Google Classroom assignment post).

Team Agreement 2017

I will review your guiding question and return your document to you with my approval, or with suggestions for revision. If your question is approved, you may proceed to the planning phase of the project. If your question needs revisions, submit the revisions for my approval as soon as possible.

Your guiding question must be approved by the end of the day on Friday, March 24th, 2017 for you to receive credit for the first checkpoint.

Published on Monday, March 20th, 2017

Due Date: Friday, March 24th, 2017

DIY Directional Antennas – Final Reflection

Objective:

I can complete my midterm assessment by demonstrating and evaluating what I learned during the DIY Directional Antennas Project.

Links:

DIY Antennas Project Final Reflection Form:

Google Classroom

Topics Discussed:

Wireless Networking
802.11 Wi-Fi spec
Directional Antennas
Waveguide Antenna
Yagi Antenna
Flickenger design Antenna

Assignment:

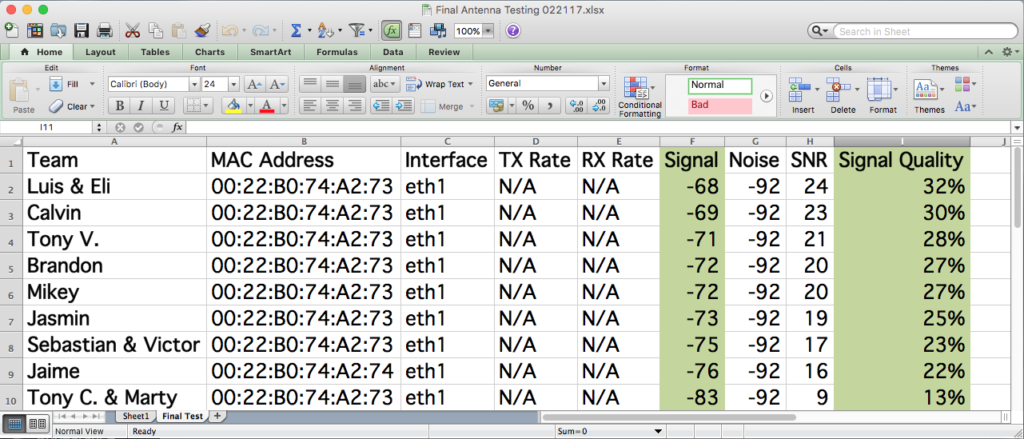
Today, we will complete our directional antenna project. Our goal was to sustain a 2.4 GHz Wi-Fi signal over a minimum distance of 100 yards (300 ft or ~92m). Many of the antenna designs successfully completed this task, but only one came out on top with a whopping -68db signal and 32% sustained signal quality over a distance of 150 yards. Please congratulate Luis and Eli for their outstanding helical antenna design that conquered all other designs. They will be enjoying pizza and wings on Friday as the rest of the class completes the final reflection assignment.

The link for the reflection assignment can be found here. Please follow the instructions on the form, and answer each question group with a complete five-sentence paragraph. Pay attention to your spelling, punctuation and grammar as you compose your paragraphs. This assignment is to be written in a professional tone in an academic voice, and it will be graded based on the criteria described on the form. Each team member must submit their own form, but can work together on the wording of the individual submissions. This assignment is effectively your final project assessment which represents the major portion of your project grade, and should be addressed accordingly.

Good luck, and thank you for all your hard work on this project. Do your best on your reflection and then it’s back to the lab for some Linux installation and configuration exercises!

Posted: February 23rd, 2017
Due Date: February 24th, 2017

Wireless Networking – DIY Directional Antennas Project: Revision Phase and Final Testing

Objective:

I can demonstrate my understanding of computer networks, network operating systems and wireless networking by assembling a directional antenna with the intent of establishing and sustaining a 2.4 GHz wireless signal at a distance of greater than 100 yards.

Links:

Do It Yourself Wireless Antenna (Pringles Can Yagi): https://www.binarywolf.com/249/pringles_cantenna.htm

How to Build a Tin Can Waveguide WiFi Antenna: https://www.turnpoint.net/wireless/cantennahowto.html

802.11b Homebrew Wi-Fi Antenna Shootout: https://www.turnpoint.net/wireless/has.html

DIY Bi-Quad Directional Wi-Fi Antenna: https://lifehacker.com/5964111/diy-wi-fi-antenna-cheaply-extends-your-wireless-network

Build a Directional Wi-Fi Antenna from Kitchen Gear and a Baby Bottle: https://lifehacker.com/build-a-directional-wi-fi-antenna-from-kitchen-gear-and-1686173362

$10 Wi-Fi 16dBi Super Antenna: https://www.instructables.com/id/10–WIFI-16dBi-Super-Antenna-Pictorial/

Topics Discussed:

Wireless Networking
802.11 Wi-Fi spec
Directional Antennas
Waveguide Antenna
Yagi Antenna
Flickenger design Antenna

Assignment:

Today, we will begin the final revision phase of our directional antenna project. Last week, two teams tied with equivalent dB gain readings on our test receiver router, but only one can win! Remember that the goal is to sustain a 2.4 GHz Wi-Fi signal over a minimum distance of 100 yards (300 ft or ~92m) and the winner will be the one who sustains the highest (negative) dB reading and signal quality over the longest distance.

We will conduct final tests the week of February 21st (Monday the 20th is a holiday!). To be considered a success (and receive credit for the project), your antenna design must be able to sustain at least a one-bar wireless signal over a 100 yard distance (the length of the football field). If your team is not present for the final test or you do not have a working antenna to test on Tuesday, February 21st, you will receive a zero on the second half of this project without the opportunity for make-up. (We’re only going out to the field once.)

Reminder: The team (or individual) that produces the antenna that can reliably sustain the highest gain signal over the longest distance will receive a personal pizza and wings party, to be held while everyone else writes a four paragraph personal reflection describing their participation in this project.

Good luck, and remember: Your antenna doesn’t have to be perfect, it just has to be better than everyone else’s.

Posted: February 13th, 2017
Due Date: February 17th, 2017

Wireless Networking – DIY Directional Antennas Project: Build Phase and Testing

Objective:

I can demonstrate my understanding of computer networks, network operating systems and wireless networking by assembling a directional antenna with the intent of establishing and sustaining a 2.4 GHz wireless signal at a distance of greater than 100 yards.

Links:

Do It Yourself Wireless Antenna (Pringles Can Yagi): https://www.binarywolf.com/249/pringles_cantenna.htm

How to Build a Tin Can Waveguide WiFi Antenna: https://www.turnpoint.net/wireless/cantennahowto.html

802.11b Homebrew Wi-Fi Antenna Shootout: https://www.turnpoint.net/wireless/has.html

DIY Bi-Quad Directional Wi-Fi Antenna: https://lifehacker.com/5964111/diy-wi-fi-antenna-cheaply-extends-your-wireless-network

Build a Directional Wi-Fi Antenna from Kitchen Gear and a Baby Bottle: https://lifehacker.com/build-a-directional-wi-fi-antenna-from-kitchen-gear-and-1686173362

$10 Wi-Fi 16dBi Super Antenna: https://www.instructables.com/id/10–WIFI-16dBi-Super-Antenna-Pictorial/

Topics Discussed:

Wireless Networking
802.11 Wi-Fi spec
Directional Antennas
Waveguide Antenna
Yagi Antenna
Flickenger design Antenna

Assignment:

Today, we will continue the build phase of our directional antenna project. Remember that the goal is to sustain a 2.4 GHz Wi-Fi signal over a minimum distance of 100 yards (300 ft or ~92m).

All tools and equipment are on the metal cart Room 212. The wireless network cards are located in the cabinet closest to the Teacher Workroom door in Room 212. If the cabinet is locked, see Mr. Herrera for the key. The transmitter testing cart is in the back of Room 225, and the username and password is on a stickynote at the bottom of the screen. The receiver cart (with the target router) is there as well, but will need a magnet instructor to log in with the admin password.

Please use this time to make progress on your project. On Friday, February 10th, we will go out to the football field and test all completed antennas to allow those with working products to see the results and modify their designs if necessary. You should have a finished antenna prepared to test at that time so you can tweak the design if necessary before the final test on the week of the 20th!

We will conduct final tests during the week of March 20th. To be considered a success (and receive credit for the project), your antenna design must be able to sustain at least a one-bar wireless signal over a 100 yard distance (the length of the football field).

Reminder: The team (or individual) that produces the antenna that can reliably sustain the highest gain signal over the longest distance will receive a personal pizza and wings party, to be held while everyone else writes a four paragraph personal reflection describing their participation in this project.

Good luck, and remember: Your antenna doesn’t have to be perfect, it just has to be better than everyone else’s.

Posted: February 6th, 2017
Due Date: February 10th, 2017

Wireless Networking – DIY Directional Antennas Project 2017

Objective:

  • I can demonstrate my understanding of computer networks, network operating systems and wireless networking by assembling a directional antenna with the intent of establishing and sustaining a 2.4 GHz wireless signal at a distance of greater than 100 yards.

Links:

Do It Yourself Wireless Antenna (Pringles Can Yagi): https://www.binarywolf.com/249/pringles_cantenna.htm

How to Build a Tin Can Waveguide WiFi Antenna: https://www.turnpoint.net/wireless/cantennahowto.html

802.11b Homebrew Wi-Fi Antenna Shootout: https://www.turnpoint.net/wireless/has.html

DIY Bi-Quad Directional Wi-Fi Antenna:  https://lifehacker.com/5964111/diy-wi-fi-antenna-cheaply-extends-your-wireless-network

Build a Directional Wi-Fi Antenna from Kitchen Gear and a Baby Bottle: https://lifehacker.com/build-a-directional-wi-fi-antenna-from-kitchen-gear-and-1686173362

$10 Wi-Fi 16dBi Super Antenna: https://www.instructables.com/id/10–WIFI-16dBi-Super-Antenna-Pictorial/

Topics Discussed:

  • Wireless Networking
  • 802.11 Wi-Fi spec
  • Directional Antennas
  • Waveguide Antenna
  • Yagi Antenna
  • Flickenger design Antenna

Assignment:

Today, we are going to begin a focused short-term project in preparation for our broader long-term project following Spring Break. The goal is simple: design and build a directional antenna that will sustain a 2.4 GHz Wi-Fi signal over a minimum distance of 100 yards (300 ft or ~92m).

The stretch goal is a little more complex: design and build a directional antenna that will extend that 2.4 GHz Wi-Fi signal as far as possible.

  1. Use the links I have provided to learn about do-it-yourself directional antenna designs. There are many designs to choose from, so do your research and select the design that you think will be most effective in extending and sustaining the Wi-Fi signal over the longest range.
  2. You may work with a partner, or choose to go it alone. If you choose to work with a partner, you will need to pick up and complete both a Project Team Contract and a Project Team Work Plan (available in the Student Pickup Folder in the Marmolejo NetOp 1-2 subfolder on the StudentsTempFiles network share).
  3. Even if you are working by yourself, use the Project Team Work Plan to identify and prepare for the steps of this project (i.e. research, acquisition of materials, installation, configuration, building, testing, modification and upgrades). Submit a completed Project Team Work Plan to the instructor as soon as it is completed.
  4. Proceed with the first identified steps in your Project Team Work Plan. Do your best to follow the plan, but don’t be afraid to amend or alter the plan as the need arises.
  5. You may work in Room 225, but you will need to notify the instructor if you need access the tools in Room 212.
  6. All tools and equipment are located in Room 212. The wireless network cards are located in the cabinet closest to the Teacher Workroom door in Room 212. You will need to request a wireless network card when you are ready to install it in your PC. (We only have four 802.11g network cards, so you will need to share unless you are willing to provide your own).
  7. Please use this time to make progress on your project. We have time provided to complete the project, but no time to waste. It is highly likely that your first antenna design may not be your final design, and you will need time to test and make adjustments to your design to achieve optimal results. Use the time given to build, test, modify and retest to get the best results!
  8. We will conduct initial tests the week of February 6th. To be considered a success (and receive credit for the project), your antenna design must be able to sustain at least a one-bar wireless signal over a 100 yard distance (the length of the football field).
  9. Upon completion of initial tests, you will have a week to revise and retest your design before the final testing during the week of February 20th.
  10. The team (or individual) that produces the antenna that can reliably sustain the highest gain signal over the longest distance on the final testing day will receive a personal pizza and wings party, to be held while everyone else writes a four paragraph personal reflection describing their participation in this project.

Good luck, and remember: the best way to eat an elephant is one bite at a time.

Posted: January 26th, 2017
Due Date: February 6th, 2017

Chap. 6 Lab – Ethernet Cat5e Patch Cable Assembly

Objective

  • I can demonstrate my understanding of physical networking media by assembling a Cat5e network cable to the Ethernet EIA/TIA 568A and 568B standards.

Links:

Topics Discussed:

  • Chapter 6: The Internet and World Wide Web
  • Networking Fundamentals
  • Ethernet
  • EIA/TIA
  • 568A & 568B Standards
  • Cat5, 5e & 6
  • Local Area Network
  • Cable Management

Assignment:

  1. This week, we will be working on our Ethernet Cabling exercise, where we will assemble an Ethernet Cat5e cable to the EIA/TIA 568A and 568B standards.
  2. Visit the web links provided above for instructions on how to build a Cat5e cable to the EIA/TIA 568A or 568B spec. Read through the instructions completely before proceeding. Pay particular notice to the difference between a “passthrough” cable and a “crossover” cable.
  3. Visit the rolling cart to pick up your tools and materials. You will need a arm’s length of Cat5e cable, two RJ-45 cable ends (with load bars), and a crimper tool.
  4. Follow the instructions to build your passthrough patch cable.
  5. Once you have your passthrough cable built, test it using the provided cable tester. If your cable test is successful, you may proceed to build a “crossover” cable for extra credit.
  6. Use clear tape and a marker to label your cables with your name and what type of cable it is (passthrough or crossover), and place it in the wire basket on the front table in the room.
  7. Once they are graded, you are free to take your Cat5e cable home for your own use. Cables left behind will be deployed within the department.

Assigned: January 20th, 2017
Due Date: January 21st, 2017

Chap. 6 – Communications, Networks and Cyberthreats – LearnSmart

Objective:

The first half of this chapter describes networks and wired and wireless media. Students consider how analog and digital data differ and how a modem translates signals from one to the other. We also cover the benefits of networks and their types, components, and variations.

Students will then discuss the various types of wired communications media. We conclude with a discussion of wireless communications media, both long distance and short distance.

In the second half of this chapter, we consider cyberthreats, security, and privacy issues. We describe four types of cyberintruders: trolls, spies, hackers, and thieves. We discuss cyberattacks and malware threats to computers and networks. We end by considering issues of privacy and identity theft.

Link:

Topics Discussed:

  • Analog Data
  • Digital Data
  • Modem
  • Networks
  • Wired Media
  • Wireless Media
  • Cyberthreats, Security, & Privacy Issues
    Cyberintruders
  • Cyberattacks
  • Malware
  • Privacy & Identity Theft

Assignment:

  1. Complete the Chapter LearnSmart module, due Friday, January 13th. This Practice assignment consists of 120 questions.
  2. When you are finished with this LearnSmart assignment, you may review the chapter in preparation for the quiz.
Assigned: January 9th, 2017
Teacher Pacing Due Date: January 13th, 2017